AlertDialog sample program in Android
By: Ashley in Android Tutorials on 2011-07-02
This sample android program shows you how to use an Alert Dialog box in Android.
The AlertDialogDemo.java file is as follows:
package com.javasamples;

import android.app.Activity;
import android.app.AlertDialog;
import android.content.DialogInterface;
import android.os.Bundle;
import android.view.View;
import android.view.View.OnClickListener;
import android.widget.Button;
import android.widget.EditText;

public class AlertDialogDemo extends Activity {
	Button btnGo;
	EditText txtMsg;
	String msg;

    @Override
    public void onCreate(Bundle savedInstanceState) {
        super.onCreate(savedInstanceState);
        setContentView(R.layout.main);
        txtMsg =  (EditText)findViewById(R.id.txtMsg);

        btnGo = (Button) findViewById(R.id.btnGo);
        btnGo.setOnClickListener(new OnClickListener() {
			public void onClick(View arg0) {
				AlertDialog diaBox = makeAndShowDialogBox();

			    diaBox.show();

				txtMsg.setText("I am here!");
			}

        });
    }//onCreate


	private AlertDialog makeAndShowDialogBox(){

        AlertDialog myQuittingDialogBox =

        	new AlertDialog.Builder(this)
        	//set message, title, and icon
        	.setTitle("Terminator")
        	.setMessage("Are you sure that you want to quit?")
        	.setIcon(R.drawable.ic_menu_end_conversation)

        	//set three option buttons
        	.setPositiveButton("Yes", new DialogInterface.OnClickListener() {
        		public void onClick(DialogInterface dialog, int whichButton) {
            	 //whatever should be done when answering "YES" goes here
        		 msg = "YES " + Integer.toString(whichButton);
        		 txtMsg.setText(msg);
        		}
        	})//setPositiveButton
        /*	.setNeutralButton("Cancel", new DialogInterface.OnClickListener() {
        		public void onClick(DialogInterface dialog, int whichButton) {
            	 //whatever should be done when answering "NO" goes here
        		 msg = "Cancel " + Integer.toString(whichButton);
        		 txtMsg.setText(msg);
        		}
        		})*/


        	.setNegativeButton("NO", new DialogInterface.OnClickListener() {
        		public void onClick(DialogInterface dialog, int whichButton) {
            	 //whatever should be done when answering "NO" goes here
        		 msg = "NO " + Integer.toString(whichButton);
        		 txtMsg.setText(msg);
             }
        	})//setNegativeButton

        	.create();

        	return myQuittingDialogBox;
    }

}//AndSelectionWidgets
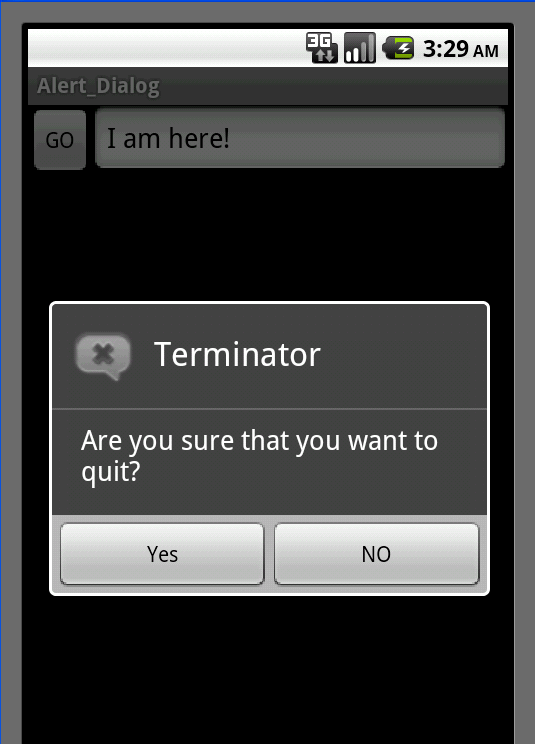
The output is as shown in the emulator below
The main.xml file in your res/layout folder is as follows:
<LinearLayout
    android:id="@+id/LinearLayout01"
	android:layout_width="fill_parent"
	android:layout_height="fill_parent"
	xmlns:android="http://schemas.android.com/apk/res/android"
	android:orientation="horizontal">
	<Button
	   android:text="GO"
	   android:id="@+id/btnGo"
	   android:layout_width="wrap_content"
	   android:layout_height="wrap_content">
	 </Button>
	 <EditText
	   android:hint="click the button"
	   android:id="@+id/txtMsg"
	   android:layout_width="fill_parent"
	   android:layout_height="wrap_content">
	 </EditText>

</LinearLayout>
Add Comment
This policy contains information about your privacy. By posting, you are declaring that you understand this policy:
- Your name, rating, website address, town, country, state and comment will be publicly displayed if entered.
- Aside from the data entered into these form fields, other stored data about your comment will include:
- Your IP address (not displayed)
- The time/date of your submission (displayed)
- Your email address will not be shared. It is collected for only two reasons:
- Administrative purposes, should a need to contact you arise.
- To inform you of new comments, should you subscribe to receive notifications.
- A cookie may be set on your computer. This is used to remember your inputs. It will expire by itself.
This policy is subject to change at any time and without notice.
These terms and conditions contain rules about posting comments. By submitting a comment, you are declaring that you agree with these rules:
- Although the administrator will attempt to moderate comments, it is impossible for every comment to have been moderated at any given time.
- You acknowledge that all comments express the views and opinions of the original author and not those of the administrator.
- You agree not to post any material which is knowingly false, obscene, hateful, threatening, harassing or invasive of a person's privacy.
- The administrator has the right to edit, move or remove any comment for any reason and without notice.
Failure to comply with these rules may result in being banned from submitting further comments.
These terms and conditions are subject to change at any time and without notice.
- Data Science
- Android
- React Native
- AJAX
- ASP.net
- C
- C++
- C#
- Cocoa
- Cloud Computing
- HTML5
- Java
- Javascript
- JSF
- JSP
- J2ME
- Java Beans
- EJB
- JDBC
- Linux
- Mac OS X
- iPhone
- MySQL
- Office 365
- Perl
- PHP
- Python
- Ruby
- VB.net
- Hibernate
- Struts
- SAP
- Trends
- Tech Reviews
- WebServices
- XML
- Certification
- Interview
categories
Related Tutorials
Keep your android phone awake while debugging
compileSdkVersion vs buildToolsVersion in app/build.gradle
gradle build failed Caused by: java.lang.NoClassDefFoundError: javax/xml/bind/annotation/XmlSchema
Gradle, npm, react-native - How are they related?
Emulator: glTexImage2D: got err pre :( 0x506 internal 0x8058 format 0x1908 type 0x1401
'adb' is not recognized as an internal or external command, operable program or batch file.
Is it safe to delete userdata-qemu.img userdata-qemu.img.qcow2 files
adb.exe: no devices/emulators found
How to start the Android emulator
Get Location of an android phone programmatically
Solution to error: unable to open connection to server due to security error
Comments