Android Send SMS and Make a phone call in Android Application
By: Ashley in Android Tutorials on 2011-10-02
This sample android program shows you how to use Telephony in Android. This program demonstrates how to send SMS from your Android application. This program also shows you how to make a phone call from your Android application or Dial a number using Intent. This tutorial therefore has four different java source files.
The main file Telephony1.java file is as follows:
package com.javasamples.Telephony1;

import android.app.Activity;
import android.content.Intent;
import android.net.Uri;
import android.os.Bundle;
import android.view.View;
import android.view.View.OnClickListener;
import android.widget.Button;

/**
 * Explore telephony related functionality and APIs in Android.
 *
 * @author charliecollins
 *
 */
public class Telephony1 extends Activity {

//You could change this number to your own number.
//This number will be used to DIAL in the dial example.

    public static final String NUMBER = "555-123-1234";

    private Button dialintent;
    private Button callintent;
    private Button gotoSmsExample;
    private Button gotoPnUtilsExample;

    @Override
    public void onCreate(final Bundle icicle) {
        super.onCreate(icicle);
        this.setContentView(R.layout.main);

        this.gotoSmsExample = (Button) findViewById(R.id.gotosms_button);
        this.gotoSmsExample.setOnClickListener(new OnClickListener() {

            public void onClick(final View v) {
                Intent intent = new Intent(Telephony1.this, SmsExample.class);
                startActivity(intent);
            }
        });

        this.gotoPnUtilsExample = (Button) findViewById(R.id.gotopnutils_button);
        this.gotoPnUtilsExample.setOnClickListener(new OnClickListener() {

            public void onClick(final View v) {
                Intent intent = new Intent(Telephony1.this, PhoneNumberUtilsExample.class);
                startActivity(intent);
            }
        });

        this.dialintent = (Button) findViewById(R.id.dialintent_button);
        this.dialintent.setOnClickListener(new OnClickListener() {

            public void onClick(final View v) {
                Intent intent = new Intent(Intent.ACTION_DIAL, Uri.parse("tel:" + Telephony1.NUMBER));
                startActivity(intent);
            }
        });

        this.callintent = (Button) findViewById(R.id.callintent_button);
        this.callintent.setOnClickListener(new OnClickListener() {

            public void onClick(final View v) {
                Intent intent = new Intent(Intent.ACTION_CALL, Uri.parse("tel:" + Telephony1.NUMBER));
                startActivity(intent);
             //   Intent intent1 = new Intent(Intent.ACTION_CALL, Uri.parse("tel:" + "1234"));
               // startActivity(intent1);
            }
        });
    }

    @Override
    public void onStart() {
        super.onStart();
    }

    @Override
    public void onPause() {
        super.onPause();
    }
}
The code to Send SMS is in this file SmsExample.java :
package com.javasamples.SmsExample;

import android.app.Activity;
import android.app.PendingIntent;
import android.content.Intent;
import android.os.Bundle;
import android.telephony.PhoneNumberUtils;
import android.telephony.SmsManager;
import android.util.Log;
import android.view.View;
import android.view.View.OnClickListener;
import android.widget.Button;
import android.widget.EditText;
import android.widget.Toast;


public class SmsExample extends Activity {

    private EditText smsInputText;
    private EditText smsInputDest;
    private Button smsSend;
	private SmsManager smsManager;

    @Override
    public void onCreate(final Bundle icicle) {
        Log.d(Constants.LOGTAG, "SmsExample onCreate");

        super.onCreate(icicle);
        this.setContentView(R.layout.smsexample);

        this.smsInputDest = (EditText) findViewById(R.id.smsinputdest);
        this.smsInputText = (EditText) findViewById(R.id.smsinputtext);
        this.smsSend = (Button) findViewById(R.id.smssend_button);

        this.smsManager = SmsManager.getDefault();

        // pending intent request code NOT USED
        final PendingIntent sentIntent = PendingIntent.getActivity(this, 0, new Intent(this, SmsExample.class), 0);

        this.smsSend.setOnClickListener(new OnClickListener() {

            public void onClick(final View v) {
                Log.d(Constants.LOGTAG, "SmsExample sending SMS message via manager");

                String dest = smsInputDest.getText().toString();
                if (PhoneNumberUtils.isWellFormedSmsAddress(dest)) {

                    // dest, serviceCenter (null for default), message,
                    // sentIntent, deliveryIntent
                    //
                    // Set the second parameter to null. The scAddress relates
                    // to the address of the server on the cellular network that will handle
                    // the message, it is not the address of the sender.
                    smsManager.sendTextMessage(smsInputDest.getText().toString(), null, smsInputText.getText()
                        .toString(), sentIntent, null);

                    Toast.makeText(SmsExample.this, "SMS message sent", Toast.LENGTH_LONG).show();

                } else {
                    Toast.makeText(SmsExample.this, "SMS destination invalid - try again", Toast.LENGTH_LONG).show();
                }
            }
        });
    }

    @Override
    public void onStart() {
        super.onStart();
    }

    @Override
    public void onPause() {
        super.onPause();
    }
}
The code to handle some of the phone number formatting examples are in this file PhoneNumberUtilsExample.java :
package com.javasamples.PhoneNumberUtilsExample;

import android.app.Activity;
import android.os.Bundle;
import android.telephony.PhoneNumberUtils;
import android.util.Log;
import android.view.View;
import android.view.View.OnClickListener;
import android.view.View.OnFocusChangeListener;
import android.widget.Button;
import android.widget.EditText;
import android.widget.TextView;

public class PhoneNumberUtilsExample extends Activity {

    private TextView pnOutput;
    private EditText pnInput;
    private EditText pnInPlaceInput;
    private Button pnFormat;

    @Override
    public void onCreate(final Bundle icicle) {
        Log.d(Constants.LOGTAG, "PhoneNumberUtilsExample onCreate");

        super.onCreate(icicle);
        this.setContentView(R.layout.phonenumberutilsexample);

        this.pnOutput = (TextView) findViewById(R.id.pnoutput);
        this.pnInput = (EditText) findViewById(R.id.pninput);
        this.pnInPlaceInput = (EditText) findViewById(R.id.pninplaceinput);
        this.pnFormat = (Button) findViewById(R.id.pnformat);

        this.pnFormat.setOnClickListener(new OnClickListener() {

            public void onClick(final View v) {
                Log.d(Constants.LOGTAG, "PhoneNumberUtilsExample format TextView input - "
                    + pnInput.getText().toString());

                // format as a phone number FIRST
                String phoneNumber = PhoneNumberUtils.formatNumber(pnInput.getText().toString());
                // then convert phone number keypad alpha to numeric
                phoneNumber = PhoneNumberUtils.convertKeypadLettersToDigits(pnInput.getText().toString());

                StringBuilder result = new StringBuilder();
                result.append(phoneNumber);
                result.append("\nisGlobal - " + PhoneNumberUtils.isGlobalPhoneNumber(phoneNumber));
                result.append("\nisEmergency - " + PhoneNumberUtils.isEmergencyNumber(phoneNumber));

                pnOutput.setText(result.toString());

                pnInput.setText("");
            }
        });

        this.pnInPlaceInput.setOnFocusChangeListener(new OnFocusChangeListener() {

            public void onFocusChange(final View v, final boolean b) {
                if (v.equals(pnInPlaceInput) && (b == false)) {
                    Log.d(Constants.LOGTAG, "PhoneNumberUtilsExample formatInPlace TextView input - "
                        + pnInPlaceInput.getText().toString());
                    PhoneNumberUtils.formatNumber(pnInPlaceInput.getText(), PhoneNumberUtils.FORMAT_NANP);
                }
            }
        });
    }

    @Override
    public void onStart() {
        super.onStart();
    }

    @Override
    public void onPause() {
        super.onPause();
    }
}
This is just a file to store some constants values
package com.sqlstar;

public class Constants {

    public static final String LOGTAG = "TelephonyExplorer";
}
For the resources you will have three different layouts and hence three xmls.
The main.xml file in your res/layout/ folder will be as follows
<?xml version="1.0" encoding="utf-8"?>
<ScrollView xmlns:android="http://schemas.android.com/apk/res/android" android:layout_width="fill_parent" android:layout_height="wrap_content"><RelativeLayout xmlns:android="http://schemas.android.com/apk/res/android" android:layout_width="fill_parent" android:layout_height="fill_parent" android:gravity="center_horizontal" android:padding="10px" android.setVerticalScrollBarEnabled="true" android:background="#000000">
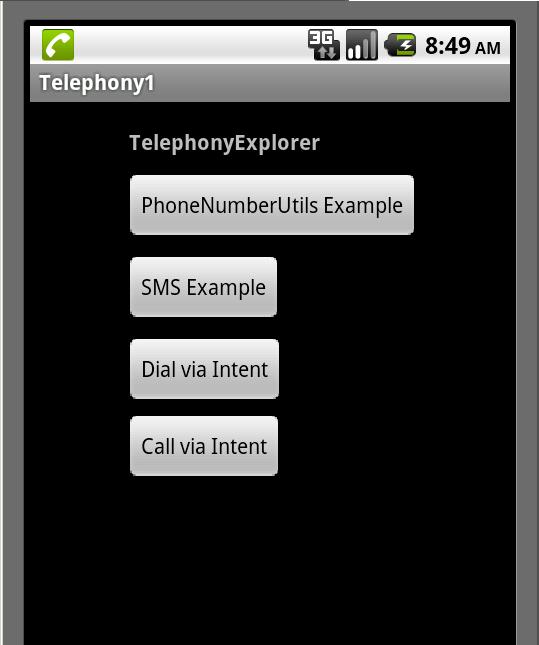
<TextView android:id="@+id/intro_label_main" android:layout_width="wrap_content" android:layout_height="wrap_content" android:layout_marginLeft="10px" android:layout_marginBottom="15px" android:layout_marginTop="15px" android:textStyle="bold" android:text="TelephonyExplorer" />
<Button android:id="@+id/gotopnutils_button" android:layout_width="wrap_content" android:layout_height="wrap_content" android:layout_below="@id/intro_label_main" android:layout_marginLeft="5px" android:layout_marginBottom="10px" android:text="PhoneNumberUtils Example" /> <Button android:id="@+id/gotosms_button" android:layout_width="wrap_content" android:layout_height="wrap_content" android:layout_below="@id/gotopnutils_button" android:layout_marginLeft="5px" android:layout_marginBottom="10px" android:text="SMS Example" />
<Button android:id="@+id/dialintent_button" android:layout_width="wrap_content" android:layout_height="wrap_content" android:layout_below="@id/gotosms_button" android:layout_marginLeft="5px" android:layout_marginBottom="5px" android:text="Dial via Intent" />
<Button android:id="@+id/callintent_button" android:layout_width="wrap_content" android:layout_height="wrap_content" android:layout_below="@id/dialintent_button" android:layout_marginLeft="5px" android:layout_marginBottom="20px" android:text="Call via Intent" />
</RelativeLayout>
</ScrollView>
The smsexample.xml file in your res/layout/ folder will be as follows
<?xml version="1.0" encoding="utf-8"?>
<ScrollView xmlns:android="http://schemas.android.com/apk/res/android" android:layout_width="fill_parent" android:layout_height="wrap_content"><RelativeLayout xmlns:android="http://schemas.android.com/apk/res/android" android:layout_width="fill_parent" android:layout_height="fill_parent" android:gravity="center_horizontal" android:padding="10px" android.setVerticalScrollBarEnabled="true" android:background="#000000">
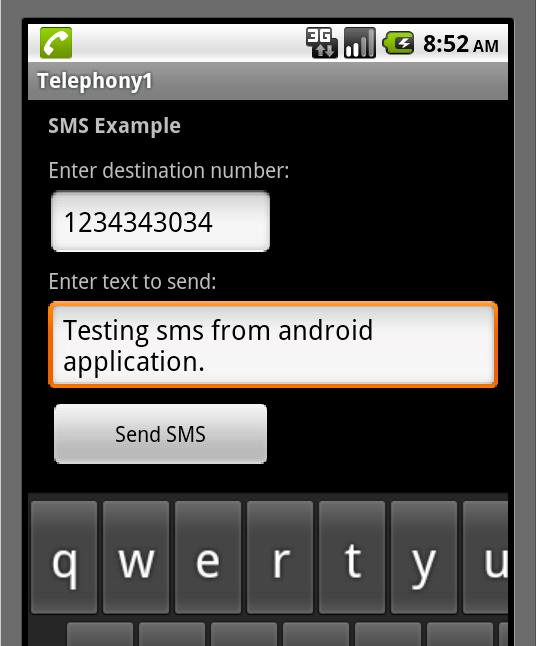
<TextView android:id="@+id/intro_label_sms" android:layout_width="wrap_content" android:layout_height="wrap_content" android:layout_marginLeft="10px" android:layout_marginBottom="15px" android:textStyle="bold" android:text="SMS Example" />
<TextView android:id="@+id/label_smsinputdest" android:layout_width="wrap_content" android:layout_height="wrap_content" android:layout_marginLeft="10px" android:layout_marginBottom="5px" android:layout_below="@id/intro_label_sms" android:text="Enter destination number:" /> <EditText android:id="@+id/smsinputdest" android:layout_width="150dip" android:layout_height="wrap_content" android:layout_marginLeft="10px" android:layout_marginBottom="5px" android:layout_below="@id/label_smsinputdest" android:text="" />
<TextView android:id="@+id/label_smsinputtext" android:layout_width="wrap_content" android:layout_height="wrap_content" android:layout_marginLeft="10px" android:layout_marginBottom="5px" android:layout_below="@id/smsinputdest" android:text="Enter text to send:" /> <EditText android:id="@+id/smsinputtext" android:layout_width="wrap_content" android:layout_height="wrap_content" android:layout_marginLeft="10px" android:layout_marginBottom="5px" android:layout_below="@id/label_smsinputtext" android:text="" />
<Button android:id="@+id/smssend_button" android:layout_width="150dip" android:layout_height="wrap_content" android:layout_below="@id/smsinputtext" android:layout_marginLeft="10px" android:layout_marginBottom="10px" android:text="Send SMS" />
</RelativeLayout>
</ScrollView>
The phonenumberutilsexample.xml file in your res/layout/ folder will be as follows
<?xml version="1.0" encoding="utf-8"?>

<RelativeLayout xmlns:android="http://schemas.android.com/apk/res/android"

   android:layout_width="fill_parent" android:layout_height="fill_parent"

   android:gravity="center_horizontal" android:padding="10px"

   android.setVerticalScrollBarEnabled="true" android:background="#000000">

 <TextView android:id="@+id/intro_label_pn"
   android:layout_width="wrap_content" android:layout_height="wrap_content"

   android:layout_marginLeft="10px" android:layout_marginBottom="15px"

   android:textStyle="bold" android:text="PhoneNumberUtils Example" />

   <TextView android:id="@+id/label_pninput"

   android:layout_width="wrap_content" android:layout_height="wrap_content"

   android:layout_marginLeft="10px" android:layout_marginBottom="5px"

   android:layout_below="@id/intro_label_pn" android:text="Input string to format:" />

   <EditText android:id="@+id/pninput" android:layout_width="250dip"

   android:layout_height="wrap_content" android:layout_marginLeft="10px"

   android:layout_marginBottom="20px" android:layout_below="@id/label_pninput"

   android:text="" />

 <Button android:id="@+id/pnformat" android:layout_width="150dip"
   android:layout_height="wrap_content" android:layout_below="@id/pninput"

   android:layout_marginLeft="10px" android:layout_marginBottom="10px"

   android:text="Format" />

 <TextView android:id="@+id/label_pnoutput"
   android:layout_width="150dip" android:layout_height="wrap_content"

   android:layout_marginLeft="10px" android:layout_marginBottom="5px"

   android:layout_below="@id/pnformat" android:text="Formatting Results:" />

   <TextView android:id="@+id/pnoutput" android:layout_width="150dip"

   android:layout_height="wrap_content" android:layout_marginLeft="10px"

   android:layout_marginBottom="25px" android:layout_below="@id/label_pnoutput"

   android:text="" />

 <TextView android:id="@+id/label_pninplaceinput"
   android:layout_width="wrap_content" android:layout_height="wrap_content"

   android:layout_marginLeft="10px" android:layout_marginBottom="5px"

   android:layout_below="@id/pnoutput" android:text="Edit in place phone number:" />

   <EditText android:id="@+id/pninplaceinput"

   android:layout_width="250dip" android:layout_height="wrap_content"

   android:layout_marginLeft="10px" android:layout_marginBottom="5px"

   android:layout_below="@id/label_pninplaceinput" android:text="" />

 <EditText android:id="@+id/pnnextfocus" android:layout_width="250dip"
   android:layout_height="wrap_content" android:layout_marginLeft="10px"

   android:layout_marginBottom="20px" android:layout_below="@id/pninplaceinput"

   android:text="Change focus to here to format previous field" />

</RelativeLayout>
Very importantly, you should add appropriate permissions in your AndroidManifest.xml file as below. Otherwise when you run the application you will get permission denied errors.
<?xml version="1.0" encoding="utf-8"?>
  <manifest xmlns:android="http://schemas.android.com/apk/res/android" package="com.sqlstar">

   <application android:icon="@drawable/icon">

   <activity android:name=".Telephony1" android:label="@string/app_name">

   <intent-filter>

   <action android:name="android.intent.action.MAIN" />

   <category android:name="android.intent.category.LAUNCHER" />

   </intent-filter>

   </activity>

 <activity android:name=".PhoneNumberUtilsExample" android:label="@string/app_name" />
   <activity android:name=".SmsExample" android:label="@string/app_name" />

 </application>

 <uses-permission android:name="android.permission.CALL_PHONE" />
   <uses-permission android:name="android.permission.MODIFY_PHONE_STATE" />

   <uses-permission android:name="android.permission.READ_PHONE_STATE" />

   <uses-permission android:name="android.permission.PROCESS_OUTGOING_CALLS" />

   <uses-permission android:name="android.permission.RECEIVE_SMS" />

   <uses-permission android:name="android.permission.READ_SMS" />

   <uses-permission android:name="android.permission.WRITE_SMS" />

   <uses-permission android:name="android.permission.SEND_SMS" />

  </manifest>
The output of this program will be as shown in the android emulator below.


Add Comment
This policy contains information about your privacy. By posting, you are declaring that you understand this policy:
- Your name, rating, website address, town, country, state and comment will be publicly displayed if entered.
- Aside from the data entered into these form fields, other stored data about your comment will include:
- Your IP address (not displayed)
- The time/date of your submission (displayed)
- Your email address will not be shared. It is collected for only two reasons:
- Administrative purposes, should a need to contact you arise.
- To inform you of new comments, should you subscribe to receive notifications.
- A cookie may be set on your computer. This is used to remember your inputs. It will expire by itself.
This policy is subject to change at any time and without notice.
These terms and conditions contain rules about posting comments. By submitting a comment, you are declaring that you agree with these rules:
- Although the administrator will attempt to moderate comments, it is impossible for every comment to have been moderated at any given time.
- You acknowledge that all comments express the views and opinions of the original author and not those of the administrator.
- You agree not to post any material which is knowingly false, obscene, hateful, threatening, harassing or invasive of a person's privacy.
- The administrator has the right to edit, move or remove any comment for any reason and without notice.
Failure to comply with these rules may result in being banned from submitting further comments.
These terms and conditions are subject to change at any time and without notice.
- Data Science
- Android
- React Native
- AJAX
- ASP.net
- C
- C++
- C#
- Cocoa
- Cloud Computing
- HTML5
- Java
- Javascript
- JSF
- JSP
- J2ME
- Java Beans
- EJB
- JDBC
- Linux
- Mac OS X
- iPhone
- MySQL
- Office 365
- Perl
- PHP
- Python
- Ruby
- VB.net
- Hibernate
- Struts
- SAP
- Trends
- Tech Reviews
- WebServices
- XML
- Certification
- Interview
categories
Related Tutorials
Keep your android phone awake while debugging
compileSdkVersion vs buildToolsVersion in app/build.gradle
gradle build failed Caused by: java.lang.NoClassDefFoundError: javax/xml/bind/annotation/XmlSchema
Gradle, npm, react-native - How are they related?
Emulator: glTexImage2D: got err pre :( 0x506 internal 0x8058 format 0x1908 type 0x1401
'adb' is not recognized as an internal or external command, operable program or batch file.
Is it safe to delete userdata-qemu.img userdata-qemu.img.qcow2 files
adb.exe: no devices/emulators found
How to start the Android emulator
Get Location of an android phone programmatically
Solution to error: unable to open connection to server due to security error
Comments