Install and Deploy JBoss Application Server
By: Abinaya in JSF Tutorials on 2007-09-18
In this tutorial let's go over the process to setup JBoss application server to run web applications.
Install JDK 5.0
You can run the java -version command from your operating system's command line to check the version of your current JDK installation. If you are running a JDK earlier than 5.0, you need to upgrade. For Linux/Unix and Windows users, you can download the latest JDK from Sun's http://java.sun.com/j2se/1.5.0/download.jsp web site. For Mac OS X users, you should download the beta version of Apple JDK 5.0 from the http://www.apple.com/java/ site.
In order to run JBoss AS successfully, you also need to set the JAVA_HOME environment variable and point it to your JDK 5.0 installation directory. On a Windows system, you can do that via the XXX tool (i.e., XXX --> XXX --> XXX --> XXX). On a Unix / Linux / Mac OS X system, you can do it via shell scripts.
Install JBoss AS
To install JBoss AS, you first have to download it from the http://labs.jboss.com/portal/jbossas/download web site. Make sure that you download the installer file (e.g., the jboss-4.0.4-installer.jar file). Run the installer with the java -jar jboss-4.0.4-installer.jar command. You will go through a series of screens to consent the license terms, and select an installation directory (see Figure 1)
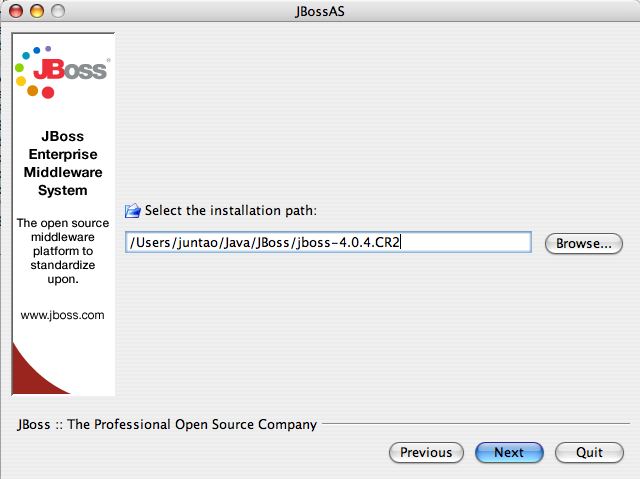 |
Figure 1. Select an installation directory
When the installer prompts you to select a server configuration, select either "ejb3" or "ejb3 with clustering" (see Figure 2).
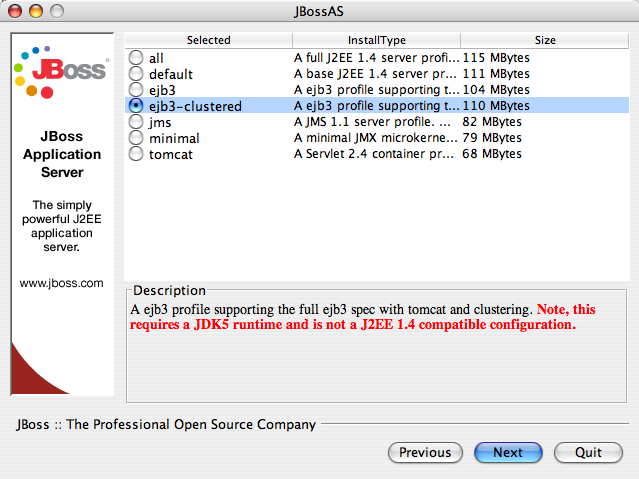 |
Figure 2. Select the EJB3 modules to install
You will be asked to choose a configuration name for this installation, leave it as default (see Figure 3). This way, you will be able to start the server without extra command line arguments.
 |
Figure 3. Use "default" as the configuration name
The installer will also give you options to secure JMX remote invokers. Those invokers allow remote users to look into your running server and even do things with it. Do secure all those and give a username/password combo to protect those resources (see Figure 4.).
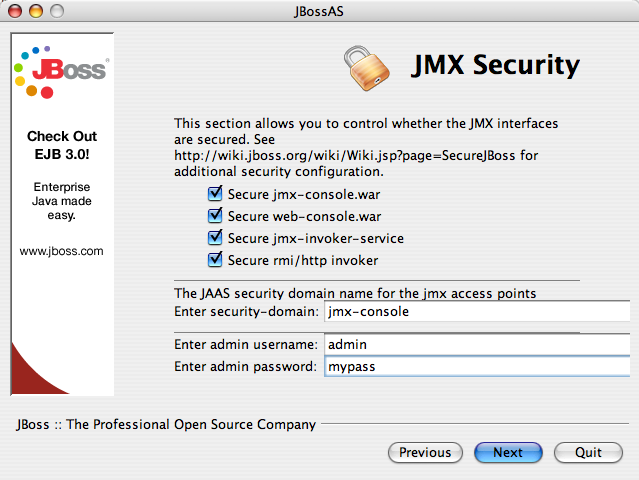 |
Figure 4. Secure all JMX invokers
How about the Seam library?
Since an independent Seam container needs to be loaded for each Seam application (see ???), the jboss-seam.jar file should be included in the application EAR file.
Deploy and Run Applications
To deploy a web application, you only need to copy the .ear application file (i.e., the build target from the source code) into the JBoss AS's server/default/deploy directory. To start the server, run bin/run.sh (or bin\run.bat on Windows). You can now access the web application URL http://localhost:8080/myapp/. Of course, replace myapp with the application URL configured in your EAR (or WAR) file.
Ant
In order to build the example application from source code, you should also have Apache Ant installed. Please refer to the Ant documentation on how to install and use it.
Add Comment
This policy contains information about your privacy. By posting, you are declaring that you understand this policy:
- Your name, rating, website address, town, country, state and comment will be publicly displayed if entered.
- Aside from the data entered into these form fields, other stored data about your comment will include:
- Your IP address (not displayed)
- The time/date of your submission (displayed)
- Your email address will not be shared. It is collected for only two reasons:
- Administrative purposes, should a need to contact you arise.
- To inform you of new comments, should you subscribe to receive notifications.
- A cookie may be set on your computer. This is used to remember your inputs. It will expire by itself.
This policy is subject to change at any time and without notice.
These terms and conditions contain rules about posting comments. By submitting a comment, you are declaring that you agree with these rules:
- Although the administrator will attempt to moderate comments, it is impossible for every comment to have been moderated at any given time.
- You acknowledge that all comments express the views and opinions of the original author and not those of the administrator.
- You agree not to post any material which is knowingly false, obscene, hateful, threatening, harassing or invasive of a person's privacy.
- The administrator has the right to edit, move or remove any comment for any reason and without notice.
Failure to comply with these rules may result in being banned from submitting further comments.
These terms and conditions are subject to change at any time and without notice.
- Data Science
- Android
- React Native
- AJAX
- ASP.net
- C
- C++
- C#
- Cocoa
- Cloud Computing
- HTML5
- Java
- Javascript
- JSF
- JSP
- J2ME
- Java Beans
- EJB
- JDBC
- Linux
- Mac OS X
- iPhone
- MySQL
- Office 365
- Perl
- PHP
- Python
- Ruby
- VB.net
- Hibernate
- Struts
- SAP
- Trends
- Tech Reviews
- WebServices
- XML
- Certification
- Interview
categories
Related Tutorials
Struts Vs JSF (A comparison of Struts against JSF)
Calling Multiple Listeners in JSF
<convertNumber> and <convertDateTime> in JSF
faces-config.xml to DirectTraffic in the JSF Application
JSF - TreeNode.setID gets IllegalArgument Exception
Servlet error : java.lang.IndexOutOfBoundsException (JSF RI 1.1_01: IndexOutOfBoundsException)
How to open a new browser window from my JSF page?
Accessing Context Data in Beans using JSF
Install and Deploy JBoss Application Server
Controlling Page Navigation in JSF - Static and Dynamic Navigation
Comments